A GitHub Workflow Primer for xQAP Group
Prerequisites
- Create a GitHub account
- Apply for the Educational Benefits (Optional)
- GitHub can be accessed through the web interface, command line, GitHub CLI, or GitHub Desktop. This guide, however, focuses on the GitHub Desktop version, which illustrates our workflow.
- To access a private repository, you may need to request permission from the administrator.
- This document provides an introduction to our standard workflow and typical scenarios. For more detailed information, please refer to the GitHub Docs.
Initial Setup
1. Configure Email Privacy
- If you contribute to public repositories and do not want your personal email address to appear in public commit metadata, make sure to keep your email address private. After making this change on the account online, update the setting on GitHub Desktop as well, so it does not create commits with your personal email address that may later be blocked from being pushed to GitHub.
2. Enable Repo Notifications
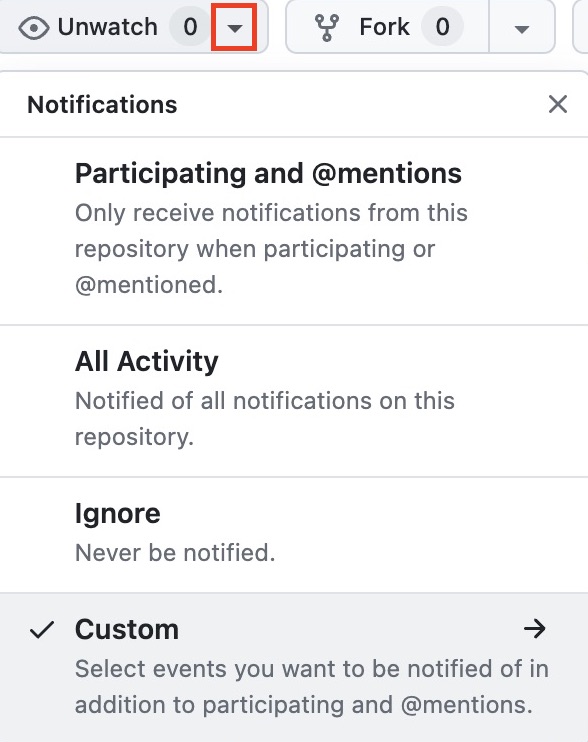
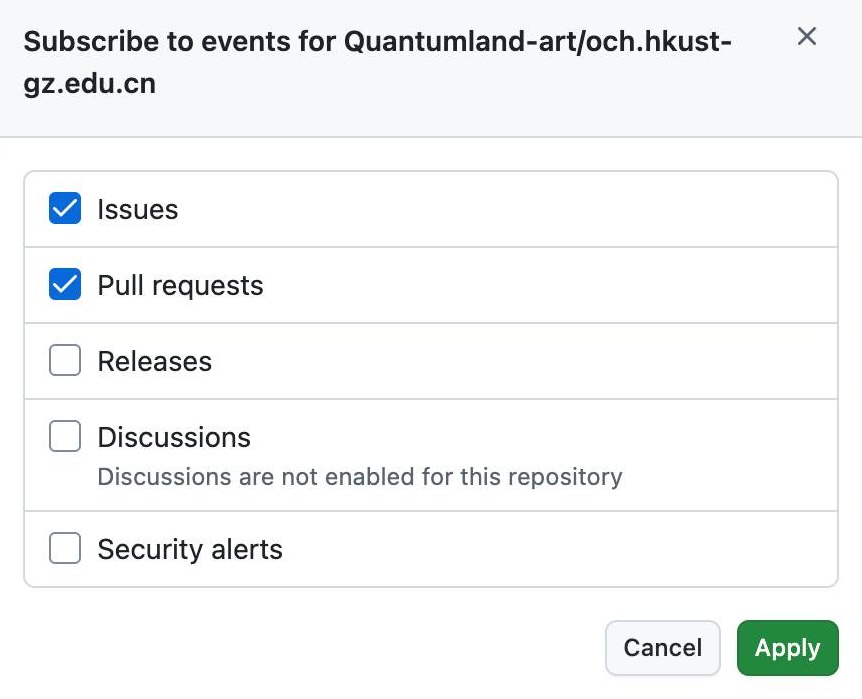
- If you want to be automatically notified about a repository before making any contribution, use the repository's Watch menu on GitHub. Choose Custom to receive notifications only for the activity types you care about, such as Issues, Pull requests, or Discussions, or choose All Activity if you want to follow everything.
3. Disable Wiki Tab
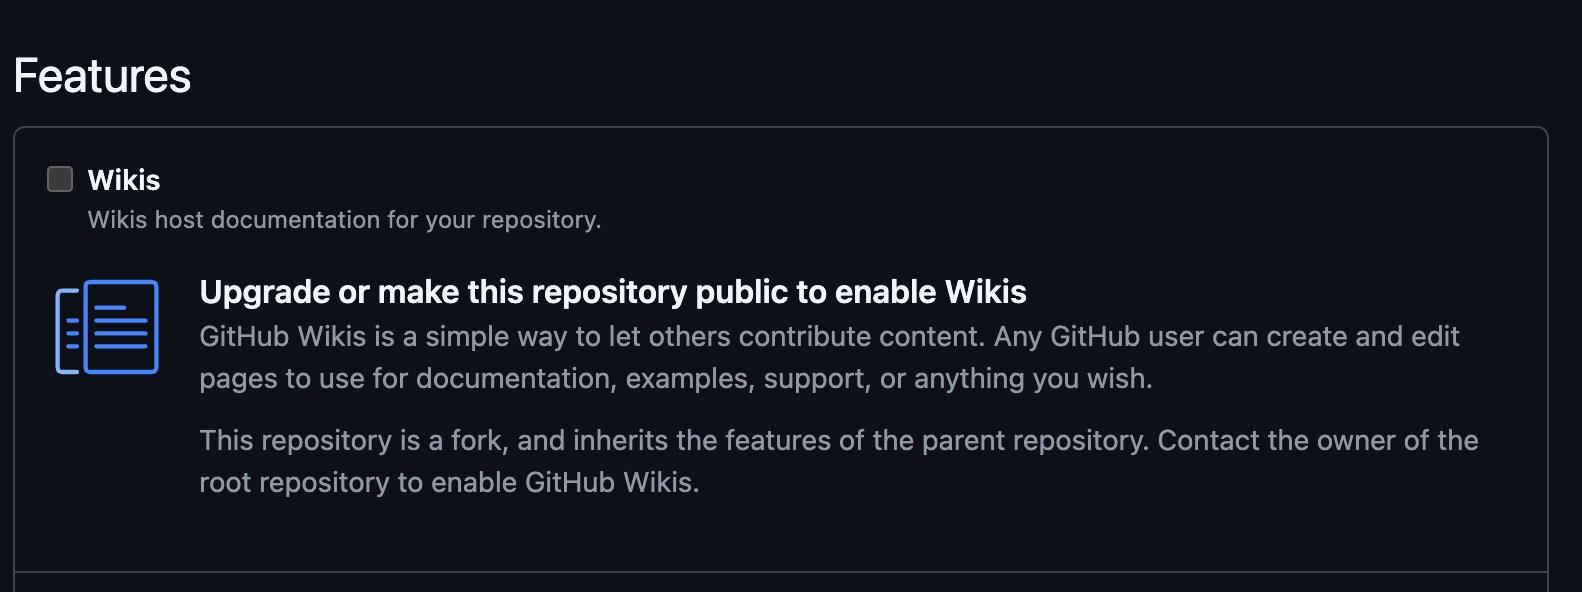
- Right after creating a new repo, make sure to disable the Wiki Tab in settings. We strongly advise to never use this, since all changes there are not tracked, and it does not sync with GitHub Desktop!
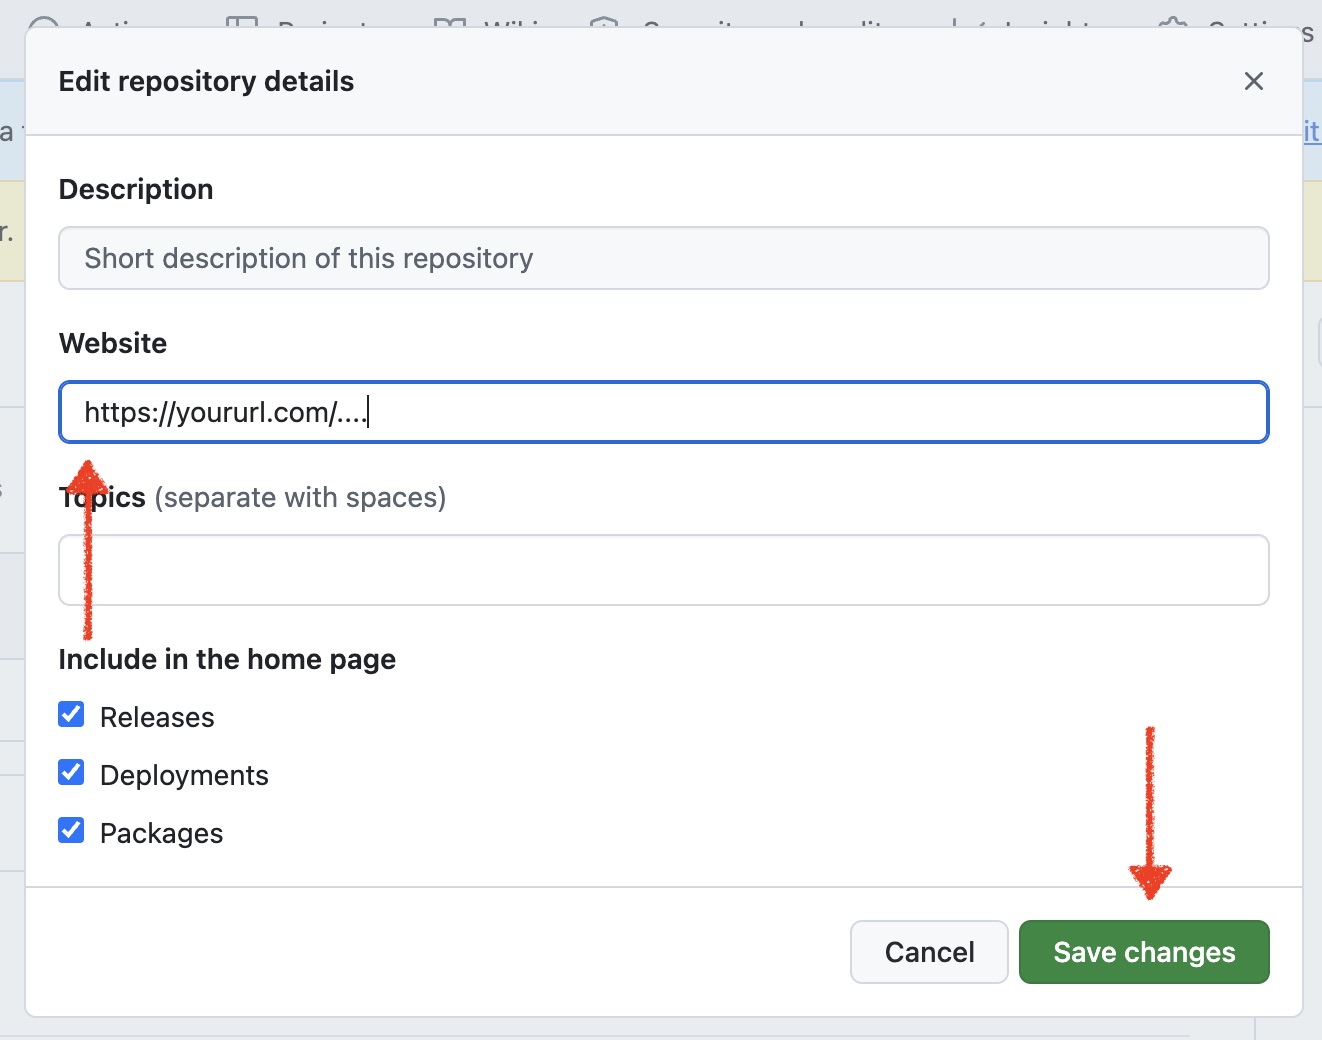
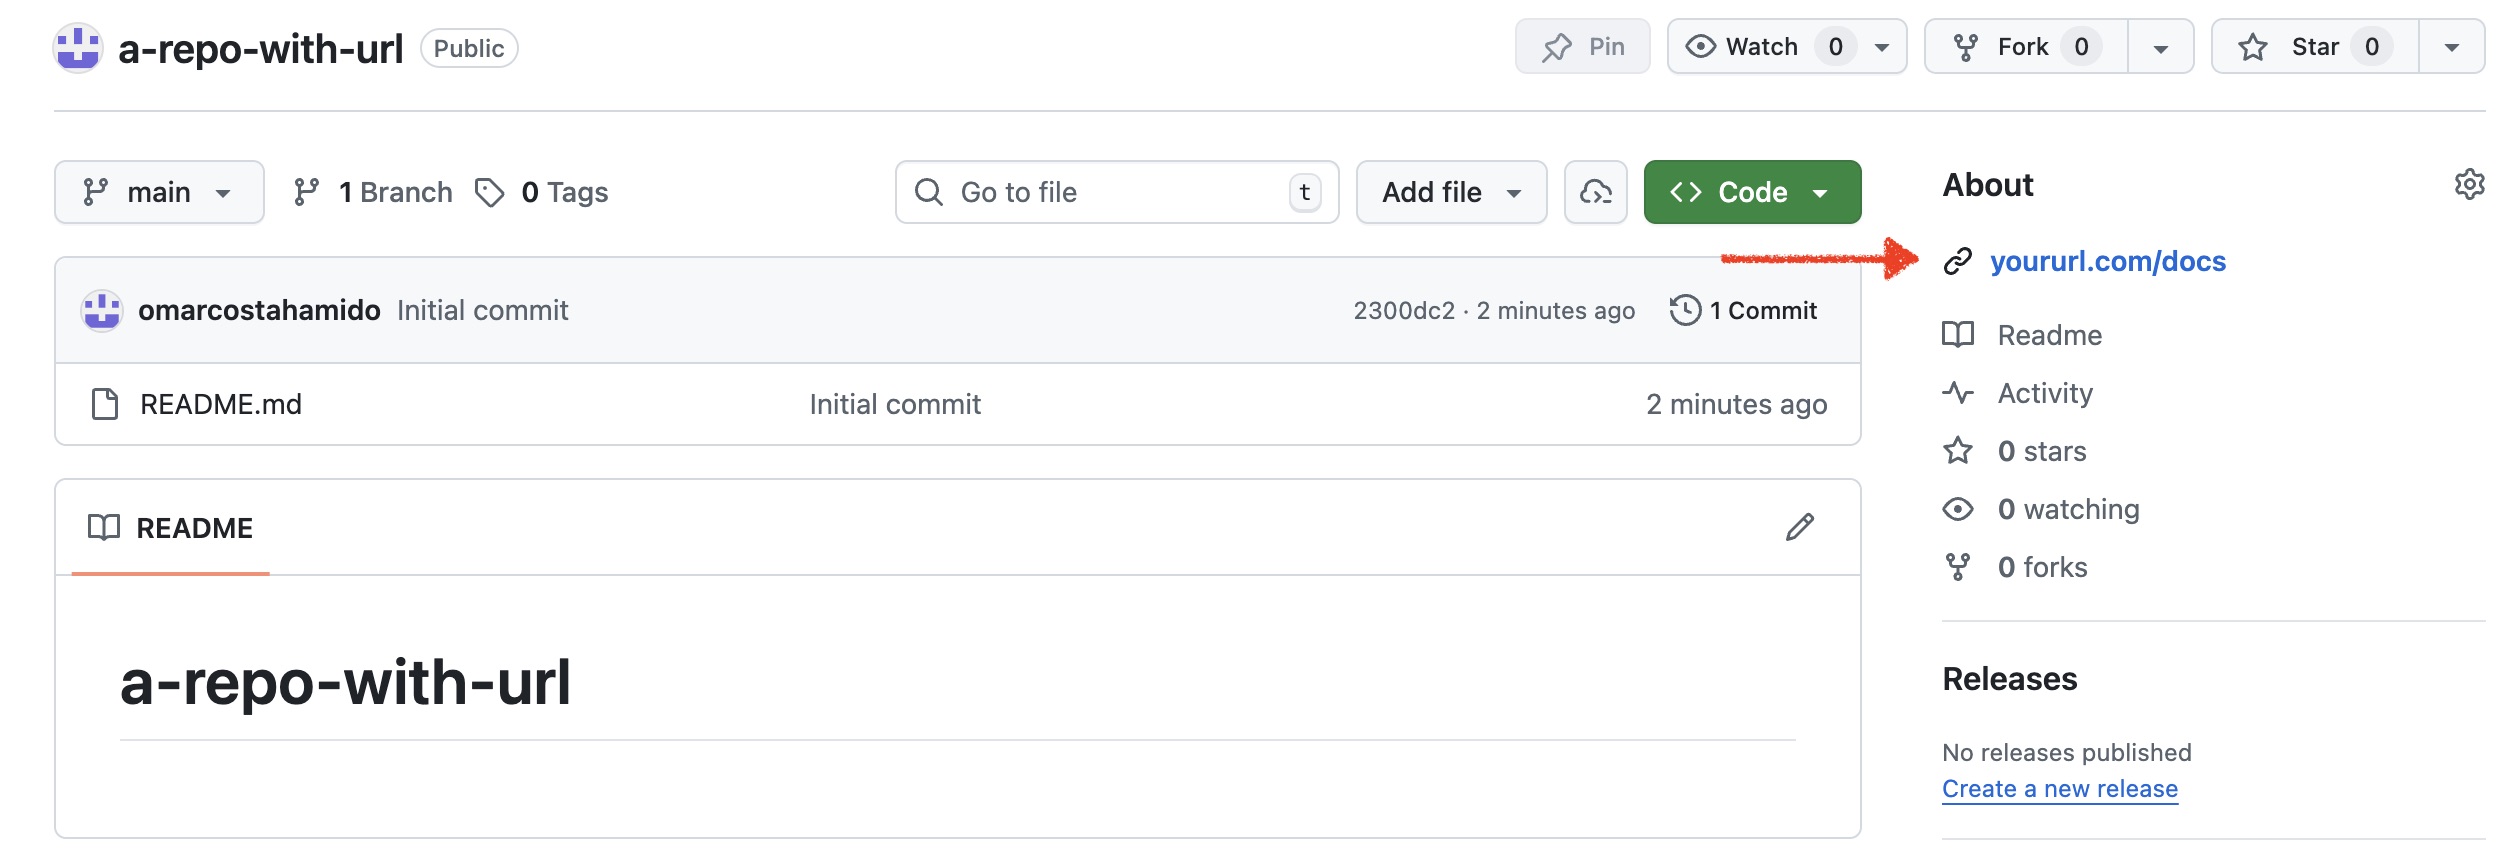
4. Add Repo URL
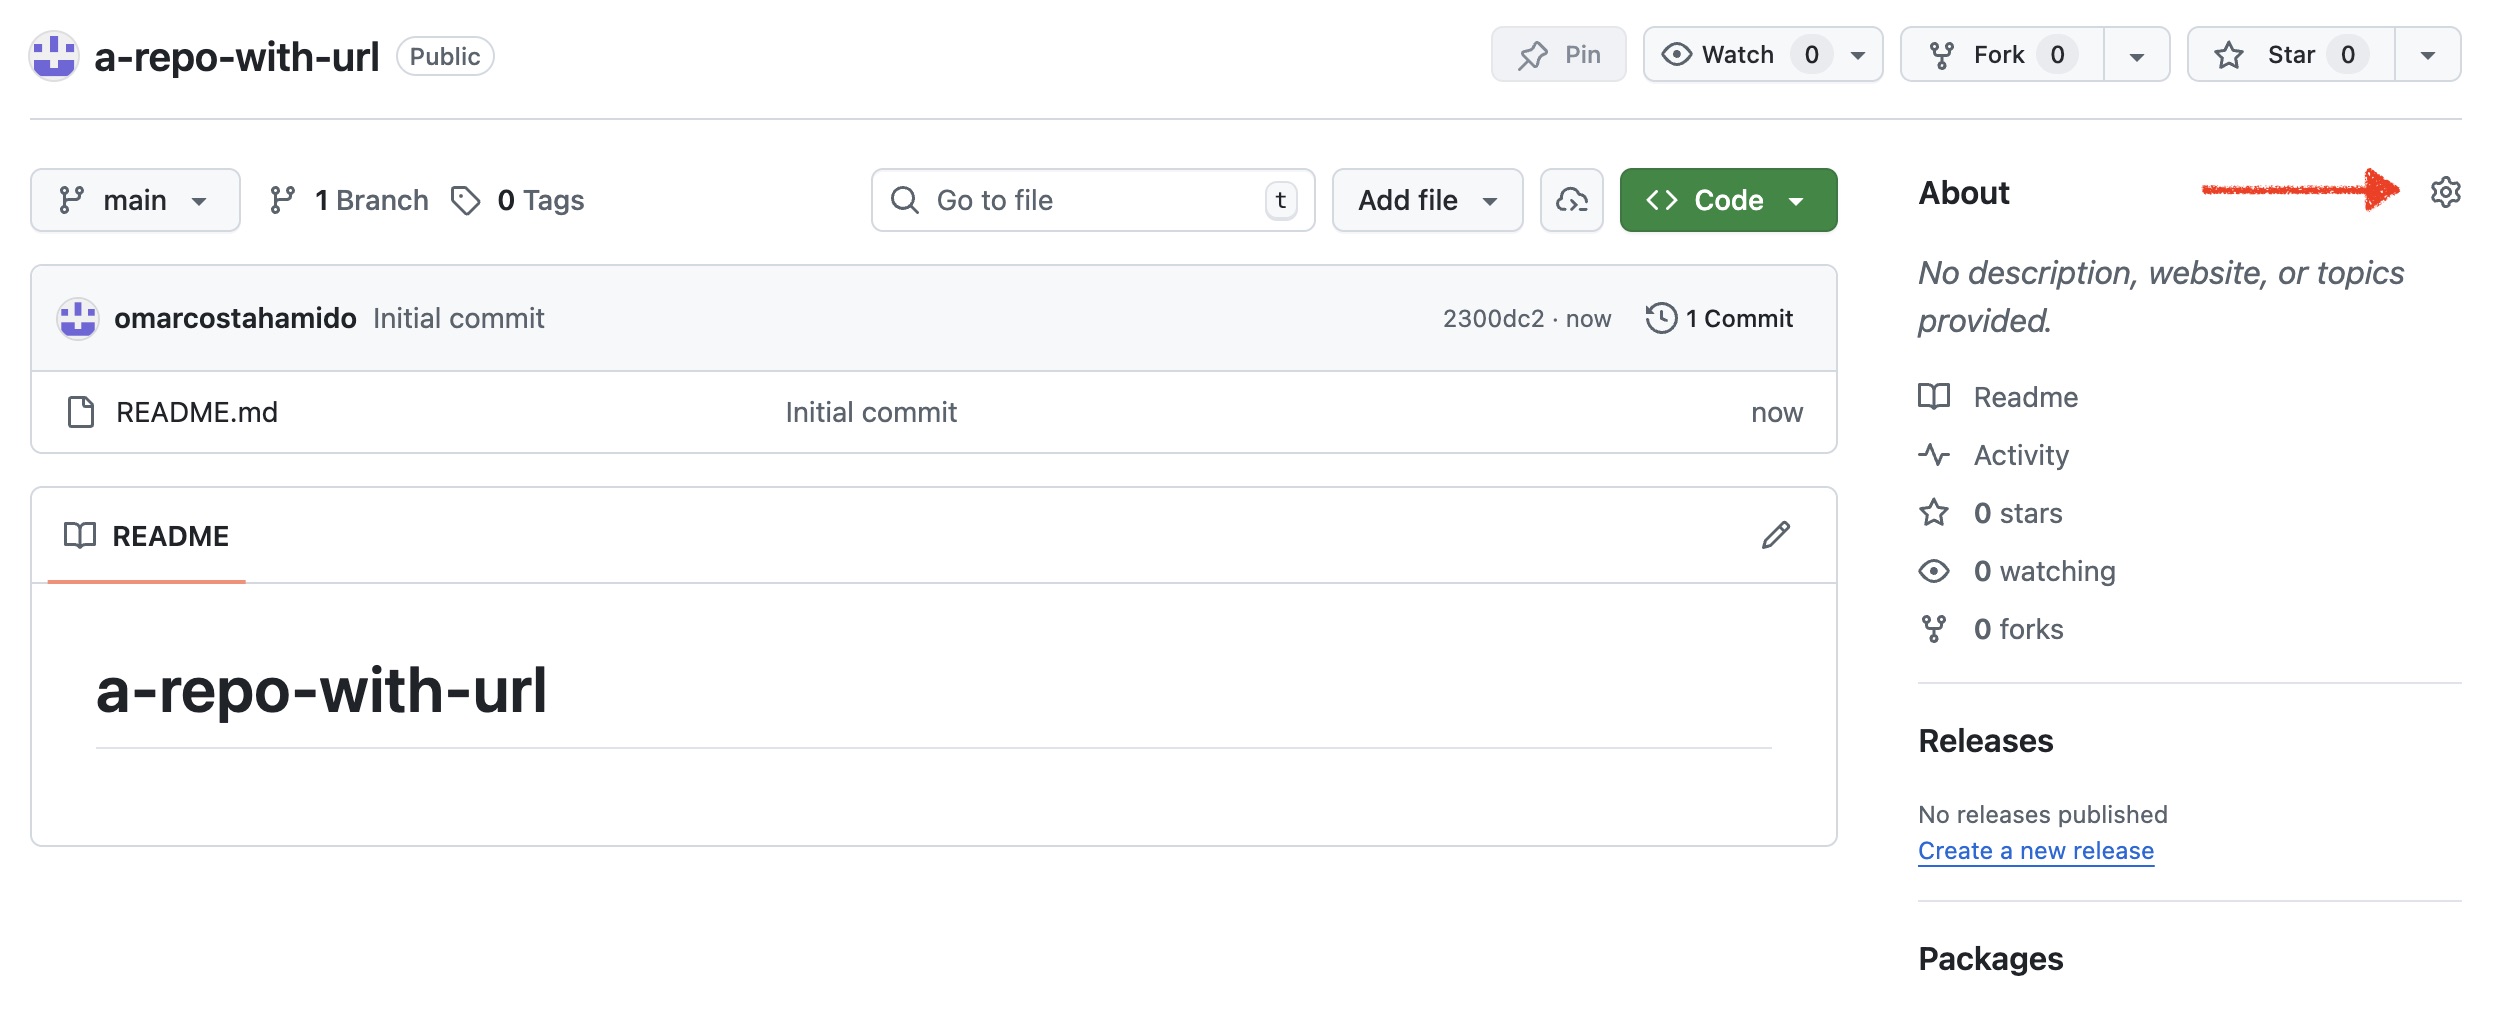
- To make the repository easier to navigate, add the most relevant project link to the repository homepage. This helps visitors quickly find the key entry point without having to search through the repository contents.
Stage 1: Communicating with Issues
- Before contributing to a repository, the recommended first step is to open an issue there to discuss and clarify your intended contribution.
- Create an issue (if none exists) to discuss what you plan to work on.
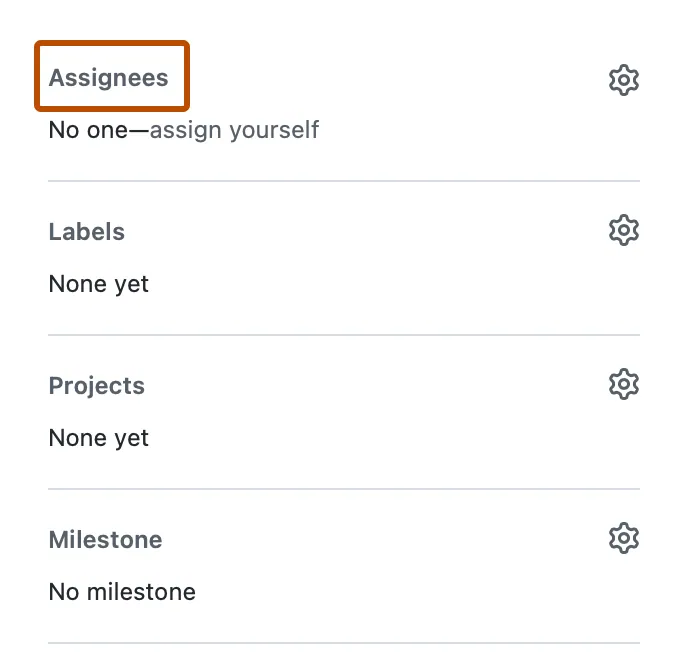
- Apply a priority label (e.g., high, medium, low) to indicate its importance/urgency.
- Assign the issue to yourself to announce that you are actively working on it, and help avoiding having 2 people working on the same issue at the same time.

Stage 2: Working Locally
1. Set Up Your Tools
- Download and install GitHub Desktop
- Clone a repository. If you are not a contributor, request access first; otherwise, you need fork it first, then you can clone it.
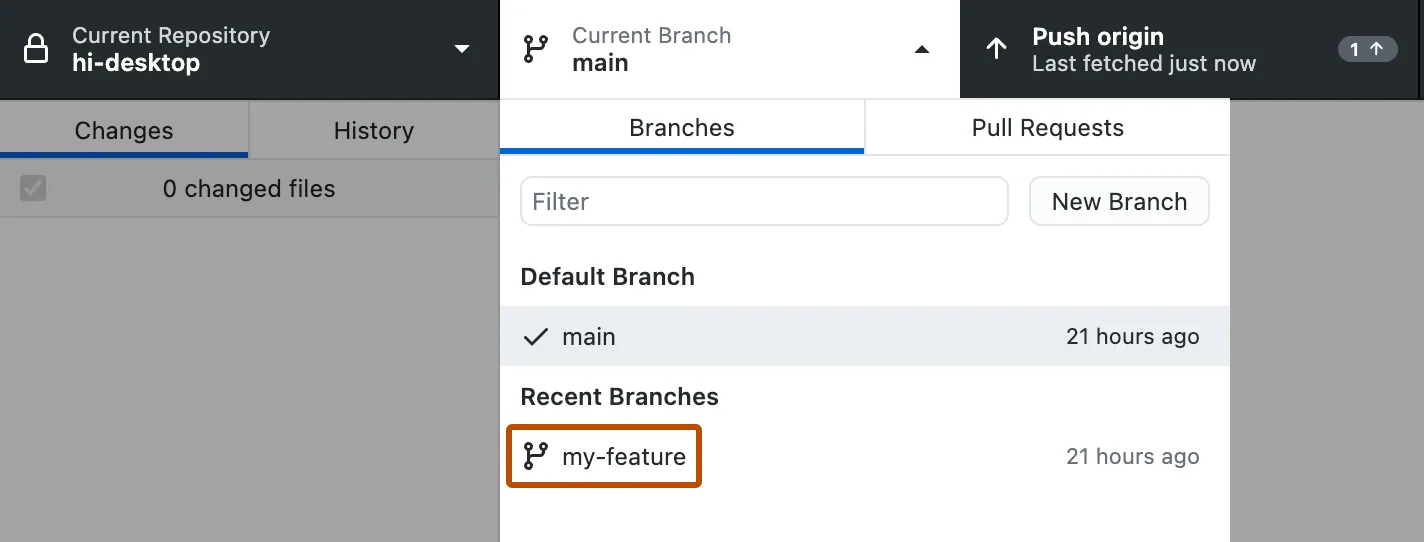
- Create a new branch. Even if you have permission, you should avoid working directly on the main branch. This practice ensures that all changes are reviewed before being merged, rather than being pushed directly to the repository.


2. Make and Preview Changes
- Open the cloned project in your preferred text editor (such as Visual Studio Code or Sublime Text) and implement your changes.
For Previewing Webpages
- Project development server: Use a dedicated development server command, such as
docs:dev(for vitepress sites), commonly found in project documentation. - VS Code Extension: If using VS Code, the Live Server extension provides an integrated and convenient way to preview HTML files with live reload.
- Python Command: Python includes simple built-in HTTP server modules, so no additional installation is required. For Python 2, use
python -m SimpleHTTPServer 8000. For Python 3, usepython3 -m http.server 8000. - npm package: Use tools like live-server and local-web-server for a simple, standalone development server.
- Online tools: use website like the HTML Online Viewer, though note that some may not render dependencies like images.
For Working on the README
- Update, Don't Accumulate: When making changes, update and replace outdated sections, rather than leaving old content intact and appending new information.
- Avoid Redundancy: Avoid repeated information; for example, state the required Python version only once in a dedicated section.
For Inserting Images
- Use Links When Possible: Prefer linking to images rather than embedding them directly. This recommendation also applies to videos.
- Image Quality and Size: Use JPG images with a quality setting of 7/12, and make them only as big as needed. In most cases, 1080p should be the maximum.
- Image Prep Tool: A super convenient tool is provided here to simplify the preparation of image files.
3. Commit Your Changes
- Once your changes are complete, review and commit them in GitHub Desktop.
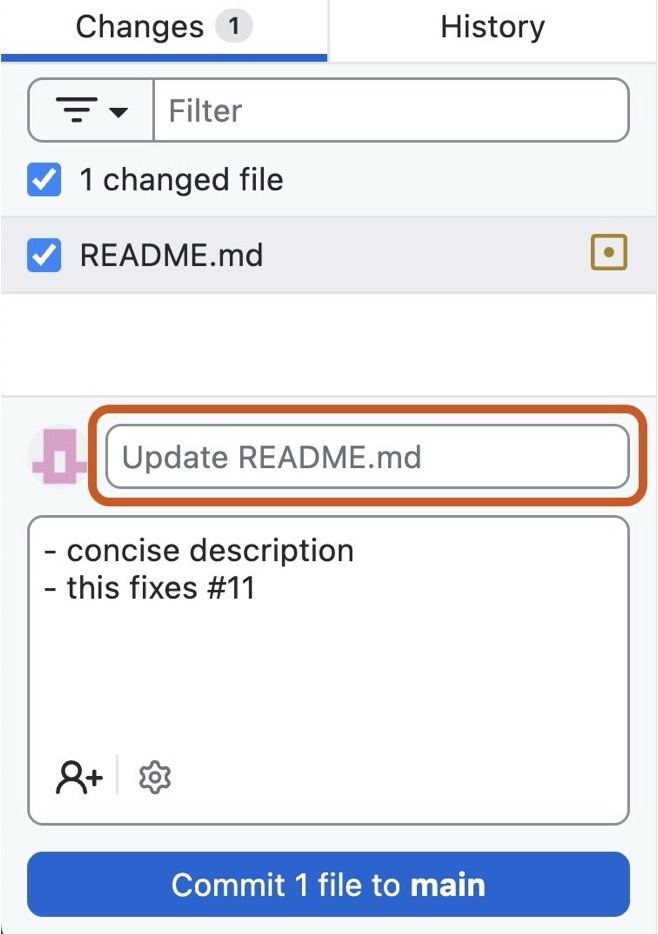
- Rule of thumb: changes in 1 file = 1 commit with a short descriptive message.
- Make use of the description textfield. Add quick bullet points, including notes to reference like `- this refers to #11` or `- this fixes #11`
- Using the default commit message (like `Update README.md`) and including description bullet points is much better than a longer commit message and an empty description. Make sure the commit message includes the name of the modified file, and the description clearly summarizes the changes.
- When editing multiple files usually Github Desktop will not provide a default commit message. This could happen for example when renaming a file, when uploading multiple image files, or when doing a very simple and repeated change across multiple files. In those rare situations you need to come up with a simple title.
- If the repo you're working on has multiple files with the same name, eg `index.html`, the default commit message might not be immediately clear of which file is being edited. In those scenarios it is good to add a portion of the path to help distinguish, eg `project1/index.html` `project2/index.html` etc.
- Optionally, to credit another author in a commit as co-author, click the add co-authors icon and type the username(s) you want to include.
- This section is really important. Please read it again and try to really incorporate it. Good commit messages/descriptions will make glancing at the commit history of the repo a much faster process to identify what happened and where. This is absolutely crucial for both development and bug tracking.
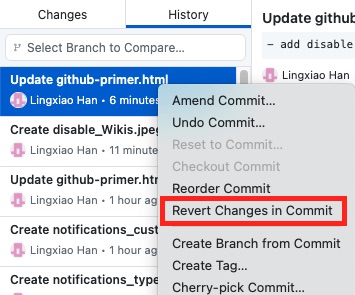
- Revert Changes in Commit in the commit history provides a quick way to return to the state before that commit.
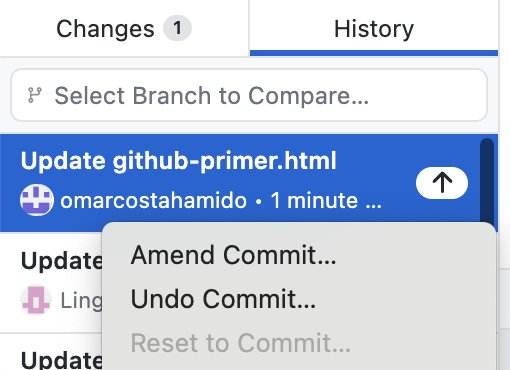
- If you have not yet synced the local clone with origin (version on github online), you may also be able to undo the last commit.

Stage 3: Merging to Repository
1. Create a Pull Request (PR)
- Push your branch to GitHub and create a pull request.
- Click Create Pull Request. GitHub Desktop will open your default browser to take you to GitHub. In the PR, clearly describe the changes using the title and description fields.
- Note: You can only push the branch to GitHub if you have write access to the repository. Otherwise, you will need to fork the repo into your account, make changes there, and then create a pull request from your fork into the origin, paying special attention to the source and destination forks when creating the pull request. This approach only applies when you want to contribute to the origin repository but do not have permission to do so. If your goal is to contribute to a forked repository, see the Contributing to Forks section below for more details.

For Pull Requests
- Branch Cleanup: Delete the branch after a PR is successfully merged.
- Updating PRs: If changes are requested, update the existing PR with new commits. Do not close the PR and create a new one for the same change set.
- Merge Strategy: For PRs containing multiple commits (especially for repeating changes), prefer the Squash and Merge option to maintain a clean commit history.
- Contributing to Forks: When contributing to a forked repository, ensure you are creating the PR against the correct fork. You can select the target fork when creating the PR. Do not attempt to merge your commits directly into the upstream repository.


2. Request a Review
- Request a review from at least one other contributor (Do not directly assign the PR to a reviewer. Assigning a PR to someone is different from requesting their review.). The PR can only be merged after receiving approval.
- Note: When asking multiple reviewers, one approval is not enough to merge the PR if another reviewer has already requested changes.


3. Use Issue Linking
- In your PR description, use
#to mention or reference related issues (for example,- this fixes #123,- this refers to #123). These keywords, likefixesresolvescloses, will create links and can automatically close issues when the PR is merged. Those keyword messages should be in the description of the commit that carries the change that finally solves the issue, instead of only in the PR merge commit message. Note: Writefixes #123, with no word between the keyword and the issue number (likefixes issue #123) in order for the keyword to trigger the issue solving.
4. Resolve Merge Conflicts
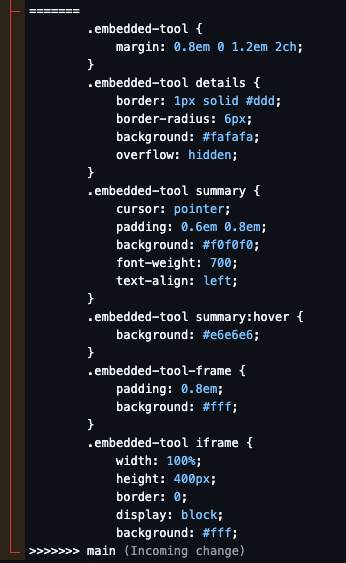
- When multiple people modify the same file at the same time, merge conflicts will occur. The person merging later will need to resolve the conflicts manually. You may need to choose between
Accept Current Changes,Accept Incoming Changes, orAccept Both Changes. The content between<<<<<<and=======represents the current changes, while the content between=======and>>>>>>represents the incoming changes. Keep the version that is appropriate for the situation. In some cases, it doesn't show a conflict but the new code will still offset or omit something that was there before, so always double-check the result after accepting changes. After confirming that all conflicts have been resolved, click Mark as Resolved, then click Commit Merge to complete the merge.

😎 Happy coding!